Easy Tilt Shift Effects with Photoshop
This page may contain links from our sponsors. Here’s how we make money.
An improvement in Photoshop (beginning with version CS6) is the ability to quickly and easily create tilt shift effects. In this post, I’ll demonstrate how you can give an ordinary photo a tilt shift effect in no time.
Creating the Tilt Shift Effect in Photoshop
I’ll be working with this photo:

Any time you are working with tilt shift or the other blur effects, be sure to save a copy of your photo in case you don’t like the results. To get started, go to Filter > Blur > Tilt Shift.

That will bring up the controls that will allow you to manipulate the tilt shift blur.

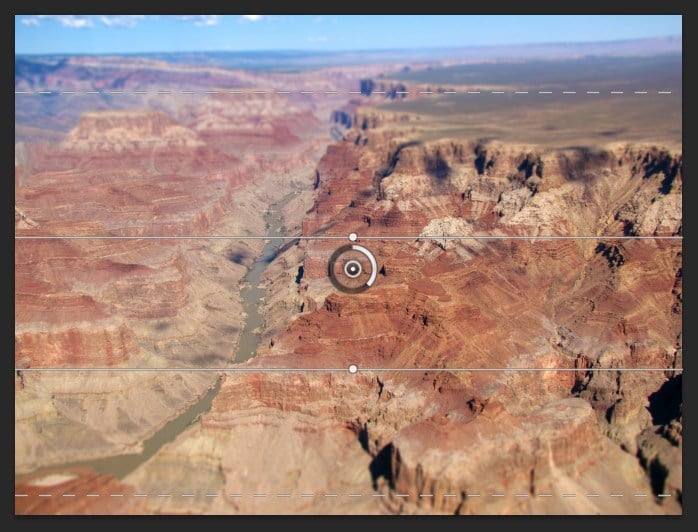
At the center you will see the adjustment ring. This area of the photo will remain sharp, and the ring allows you to change how much blur is applied (more on that in a moment). You’ll also see two lines above and below the adjustment ring. The first line is sold and the second line is dotted. The area beyond the dotted lines (the top and bottom of the photo) will be blurred based on the amount of blur you set with the adjustment ring. The blur will start at the solid lines and it will blur gradually until it gets to those dotted lines. So the area between the two solid lines is what will be sharp.

You can move any of the lines to determine what parts of the photo should be blurred and what should be sharp. For this photo, I am going to move the upper solid line a little lower, more towards the center of the photo. I’ll also move the lower solid line a little towards the bottom of the photo. Next, I’ll move each of the dotted lines further out towards the edge of the photo.
Next, I’ll increase the blur by clicking and dragging the white part of the adjustment ring.

Then click “ok” at the top and the blur will be applied. The result will look like this:

The specifics of how you want to make adjustments to the blur will vary from one photo to the next, so experiment a little bit and you can get a better feel for how Tilt Shift Blur works.